Sculptor Michael Defeo and his team are currently developing a fantastic looking anatomy reference application that bridges the gap between books and sculptures.
They plan on releasing it for a range of platforms including iPad, iPhone, Mac desktop and eventually Andriod and PC desktop and are looking for backers to help fund the project.
To find out more visit the Kickstarter page here
Wednesday 14 March 2012
Saturday 28 January 2012
Clay to Bronze - Video Journal from David Lemon
Just found this fantastic video blog by sculptor David Lemon:
A Day in the Life of a Lemon
Where he documents his day to day sculpting process and looks to cover a range of subjects. From what tools to use, armature construction, anatomy, working with bronze and much more.
I can't be sure but I think he primarily uses an oil based clay.
Well worth keeping an eye on.
Tuesday 27 December 2011
Casteline Hair Sculpting Tutorial by Andy Bergholtz
All words and pictures Andy Bergholtz.
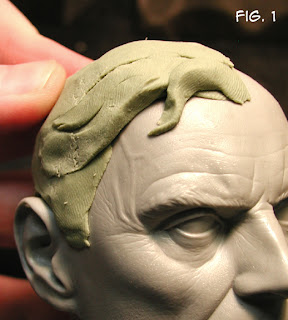


First, I warm up the Castilene in a microwave and work it in my hands like clay, applying the warm Castilene to the sculpture (Fig. 1)

After I achieve the basic form using just my fingers, I'll then heat my sculpting tool and smooth the surface (Fig. 2, Fig. 3)


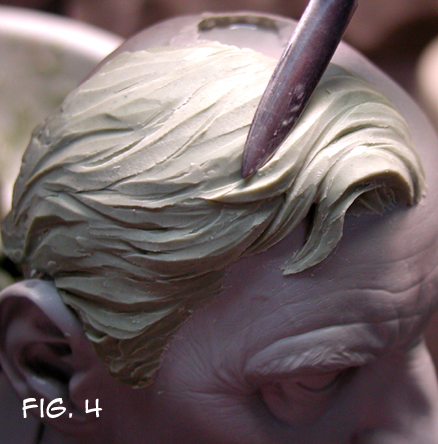
I will continue to heat the tool during this process every few seconds, holding the tool very briefly over the flame. I will continue to refine the surface with this tool until I get a basic flow of detail that I like (Fig. 4, Fig. 5)

Next, I will gently heat a small loop tool over a flame (Fig. 6), and will use this to carve some deeper detail into the form (Fig. 7). I will do this briefly, just to add a bit more depth to the form (Fig. 8)


Next, I will very briefly heat a sanding pad over the flame (Fig. 9), and use this to smooth the surface a bit (Fig. 10).


For this stage, you must heat the pad over the flame for only a half-second or so each time, VERY quickly or else it will begin to burn. You'll need to do this every 3-4 seconds while you work, and lightly drag the heated pad on the surface of the Castilene to smooth it. It sounds tricky, but it's quite simple. I'll do this until the hair is generally smoothed and ready to begin detailing (Fig. 11).

For detailing, I heat my metal tool over the flame once again (very very quickly this time, only to warm it up a little... you don't want it to be too hot, only warm enough so it doesn't "stick" to the Castilene). Then I will use the edge of the tool to "press and roll" detail into the surface of the Castilene (Fig. 12)

This "press and roll" method is the most important step in my detailing technique. I will continue doing this until I've achieved the level of detail that I want (I try to avoid dragging or 'scribing' detail in this stage, as that is what often causes the unwanted "crumb effect"). For smaller curves, I will use a smaller tool and even a round loop tool sometimes, but the "press and roll" method still applies (Fig. 13, 14, 15)


Finally, sometimes I will lightly brush down the surface with lighter fluid (Fig. 16). I do this VERY little, as using too much will make the surface grainy and mushy, so use it sparingly (Fig. 17)


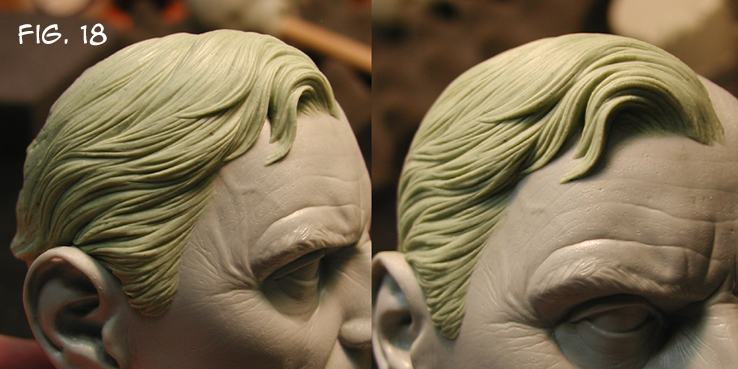
Just make sure to only brush lighter fluid on Castilene when you are completely finished with the sculpting, as it's very difficult to re-sculpt any area that has already been brushed. The hair is finished! (Fig. 18)
Saturday 12 November 2011
Tips on Smoothing Casteline
Some tips and advice on smoothing Casteline from professional sculptors Adam Beane, Keith Kopinski and Ray Villafane.
...swiped from an old thread on the Clubhouse Forums...
Lighter fluid (Rosonol for a Zippo type lighter) works GREAT!
BUT
Only use it dead last!
I think people over-use it and the sculpture gets a very soft, melted look on the high points and is still rough in the crevaces.
For the 5 years I've been sculpting, I've used soley the "hot sponge" method. This also can turn a good sculpture into an indistinct blob if over used.
Basically, try to get your sculpture as good as you can with hand tools. Use the hot 3m sponges very gently to smooth out small sections then finally use lighter fluid on a 3m sponge or brush. The sponges will "load up" so I cut them into small managable strips and throw them away when necessary.
Solvents will also only dissolve the binders in the material, leaving filler, which can result in a "grainy" look.
You can also use an alcohol torch, but I find these to be not very useful.
There is no short cut to a GOOD smooth sculpture other than time and effort. If something on my sculpture is to be smooth, it will be INTENTIONALLY smooth, not the result of some process (like melting) that I cannot directly control. Does that make sense?
So
Hand tools
Hot pads
Solvents
Another good way to heat the sanding sponges is to buy a cheap coffee mug warmer and/or candle warmer. It doesn't really scorch the sponge like waving it over open flame.
As for needing to wash a sculpt after brushing it with solvent because it will continue to eat it... I don't think so...
I try to stay away from solvents all together on castilene and just employ Adam's "hard work" theory and let the tools and effort be the guide. (Well the sponges too)
I think the castilene more so absorbs the solvent and can get kinda gummy which isn't very desirable to me...
Elbow grease.
It just takes a lot of sanding. Solvent at the end does more to simply uniform the surface finish than anything else. In other words the solvent creates a nice uniform sheen is all. It does very little to actually "smooth" the piece out. For a true smooth finish it will take many layers of sanding.
Over using the solvents more than a simple one shot brushing AFTER THE PIECE IS SMOOTHED BY SANDING will only break down the make up of the Castilene causing it to expose the fillers and in the end be less smooth.
Use the solvent to obtain a nice uniform sheen, not as a way to smooth the piece out or else you will screw up your piece. If you use too much solvent not only will the fillers start to be exposed but you will also find that as you go back and try and fix it that you have changed the properties of the Castilene into some gummier material that is near impossible to fix.
So, the moral of my story...sand, sand and sand some more. No way around it
Chavant Tutorial and Video Demos by Cyril Roquelaine
Sculpting a Vampire Bust - step by step picture tutorial.
Added to the Oil Based Clays and Wax Related Page
Added to the Oil Based Clays and Wax Related Page
Saturday 5 November 2011
Sculpting Afro-textured Hair by Mark Newman
This tutorial was originally posted by Mark Newman on the Clubhouse Sculptors Forum. Demonstrating his technique for sculpting afro-textured hair, in this example with Super Sculpey.
You can see more of Mark's masterful work here
All photos and words Mark Newman...
These are the basic tools I use for this. A few ball end tools different sizes and a tool I made out of steel wires bunched together and soldered into a piece of brass square tude. Basically it's a small steel wire brush.

I just smash on the hair form and push it around with the different size ball tools.
Then I stipple in the tighter texture with the wire brush tool.
I go back and forth with the ball tools and wire brush tool depending on how tight I want the final hair texture. From Jerry Curl to Nappy and in between.


I then lightly brush it down with Turpenoid and a soft brush to knock out the hard edges.
I then lightly stipple the surface with a stippling brush.
Especially if I want the tight kinky look.
That's about it. You can make it as tight or as loose as you want.

Subscribe to:
Posts (Atom)
